
This article explains how to run LED blinking using a handy template to get you started with embedded development in Rust at blazing speed.
By reading this article, you will be able to run the Raspberry Pi Pico in 10 minutes and be able to do the electronics development you want with the help of references.
Assumed Environment
The following assumes that you are running on Windows 11 Home, but you can follow almost the same procedure on Mac or Linux for a blazing fast introduction.
Therefore, please read the terminology (such as command prompt) according to your environment.
Prerequisite Knowledge
You need to know enough about Git to be able to use git clone.
Preparing Raspberry Pi Pico
Raspberry Pi Pico can be purchased for about $5.
To execute the contents of this article, please prepare the following items.
| Item | Quantity |
|---|---|
| Raspberry Pi Pico | 1 |
| USB cable (micro B terminal) | 1 |
Building a Rust environment
Installing Rust
First of all, you need Rust.
Please install Rust by referring to the following official site.

Updating Rust and adding targets
Bring Rust up to date to avoid known bugs.
Also, add thumbv6m-none-eabi as a development target to support development on the Raspberry Pi Pico.
Open a command prompt and execute the following command.
C:hogehoge>rustup self update
C:hogehoge>rustup update stable
C:hogehoge>rustup target add thumbv6m-none-eabi
Installing the build tool
Install elf2uf2-rs as a tool to convert a program written in Rust into a format called UF2 that can be exported to the Raspberry Pi Pico.
Open a command prompt and execute the following command.
C:hogehoge>cargo install elf2uf2-rs –lockedIf you failed to this command, please refer to

and downgrade the Rust version until elf2uf2-rs is successfully installed.
Execute LED blinking
Download development templates
For embedded development, you need to set up and prepare many crates, and it is quite difficult to do this work.
Therefore, we have prepared a template for development named rp_pico_template.
Please download it from the following URL by using git clone command or other methods.
By rewriting the project name in this directory, new project development can begin immediately.
Here are two steps to change the project name to rp_intro.
- Rename the directory from
rp_pico_templatetorp_intro - Open
Cargo.tomland rewrite the value of name in[package]torp_intro
[package]
name = "rp_intro" # <- Originally, ”rp_pico_template”.
version = "0.1.0"
…
Running LED blinking program
When you are introduced to a new programming language, you usually start by writing code that outputs Hello, world!.
For embedded development, a great place to start is by making an LED blink.
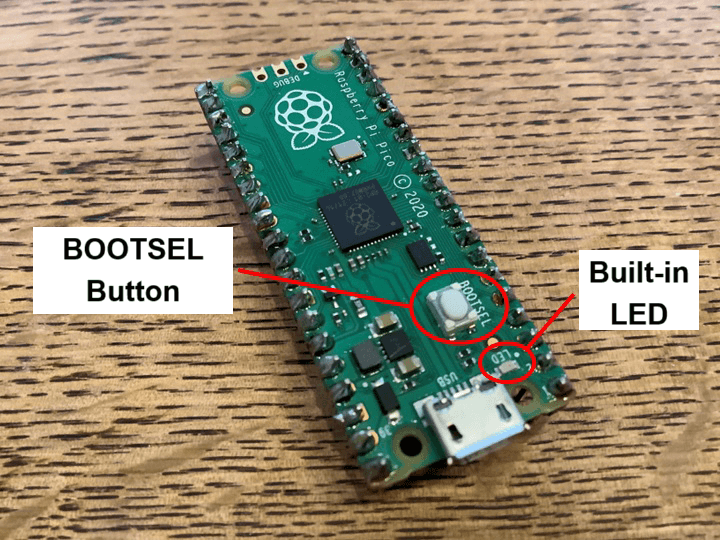
The Raspberry Pi Pico board has the built-in LED, so you don't even need to build a circuit.
And the src directory of rp_pico_template already contains a file named led.rs, which allows you to make the built-in LED blink.
Follow these steps
- At the command prompt, move to the project folder (
rp_intro) - While pressing the BOOTSEL button (see below), connect the Raspberry Pi Pico to the USB port of the PC (make sure the Raspberry Pi Pico is recognized)
- run
cargo run --release --bin ledat the command prompt
C:hogehoge>cd rp_intro
C:hogehogerp_bno055>cargo run --release --bin led
Compiling …
…
Compiling …
    Finished release [optimized] target(s) in 25.27s
     Running `elf2uf2-rs -d -s targetthumbv6m-none-eabireleaseled`
Found pico uf2 disk G:
Transfering program to pico
9.00 KB / 9.00 KB [=========================] 100.00 % 1.86 MB/s
If successfully executed, the above message will be displayed and the LED on the Raspberry Pi Pico will blink in approximately one second cycles.
A common case of failure may be that the BOOTSEL button in step 2 is not pressed correctly.
By pressing and holding this button (do not press it after inserting the device), the program previously written to the Raspberry Pi Pico will be erased and the device can be used in writing mode.
If you failed and the Raspberry Pi Pico was not properly recognized, you should see the following error message.
C:hogehogerp_intro>cargo run --release --bin led
Compiling …
…
Compiling …
    Finished release [optimized] target(s) in 25.27s
     Running `elf2uf2-rs -d -s targetthumbv6m-none-eabireleaseled`
Error: “Unable to find mounted pico”
error: process didn’t exit successfully: `elf2uf2-rs -d -s targetthumbv6m-none-eabireleaseled` (exit code: 1)
Note that if the Raspberry Pi Pico is connected to a PC without pressing the BOOTSEL button, or if power is supplied from the VSYS pin, the latest program written to the Raspberry Pi Pico before that time will be executed.
References
We have published a collection of example implementations for using the various features of the Raspberry Pi Pico with Rust.
Please try to improve led.rs with this reference and make what you want to make!
Comments